

Freepik AI Suite Review
An In-Depth Guide for Creators, Designers, and Content Producers in the United States and Canada
Artificial intelligence has changed the way people create digital content. From professional images and marketing videos to background music and voiceovers, creators now have access to tools that can handle tasks that once required multiple software applications. However, subscribing to several AI platforms can quickly become expensive and difficult to manage.
This is where Freepik’s AI creative platform comes into the picture. It brings together different AI models and creative tools in one workspace, allowing users to generate images, edit videos, create music, produce voiceovers, and manage creative projects without constantly switching between different services.
The platform has also evolved since the original video tutorial was recorded. Freepik’s AI platform is now presented under the Magnific name, while its existing account and creative ecosystem continue. So, if you are looking for the Freepik AI Suite today, it is worth knowing about this updated branding.
In this guide, we will explore how the platform works, what its main features can do, and how creators can use them in everyday projects.
Freepik AI Dashboard Overview
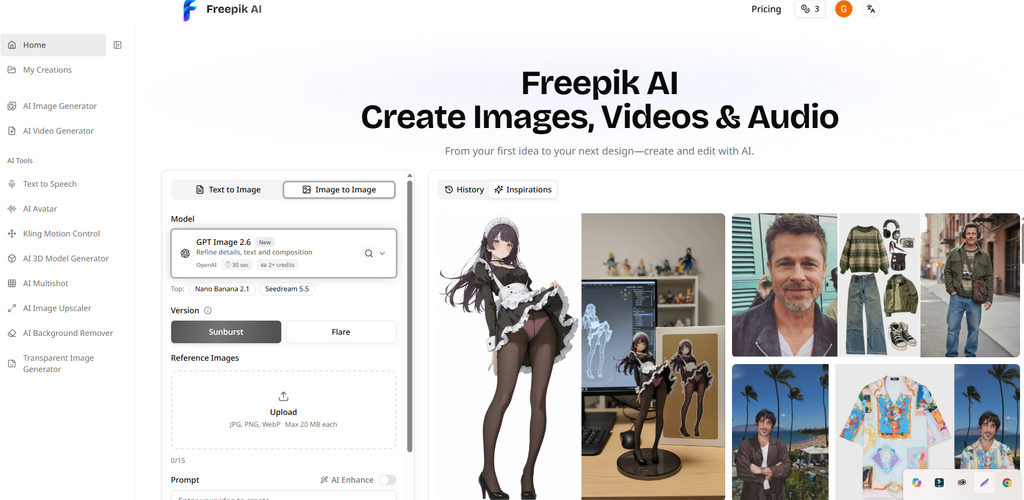
When you open the Freepik AI website, you will find a clean and simple homepage where all the main AI tools are organized in one place. The layout is easy to understand, even if you are using an AI image or video generator for the first time.
On the left side, you will see the Home option, which takes you back to the main homepage whenever you need it.
Just below Home, there is a My Creations option. Here, you can access your previously created content and keep track of the work you have made using Freepik AI.
The AI Image Generator option allows you to create images from your ideas. You can write a text prompt and let AI turn your description into an image. You can also use an existing image as a reference to create a new version.
Next, there is an AI Video Generator option where you can explore AI-powered video creation. You can use this tool to create videos with the help of AI instead of making everything manually.
Freepik AI also includes several additional tools under the AI Tools section. For example, Text to Speech allows you to turn written text into speech, while AI Avatar helps you work with AI-generated avatars.
Another interesting option is Kling Motion Control, which lets you explore AI-powered motion control features. There is also an AI 3D Model Generator for creating 3D models, along with AI Multishot for working with multiple shots.
If you want to improve the quality of an image, you can use AI Image Upscaler. The AI Background Remover helps remove unwanted backgrounds, while Transparent Image Generator lets you create images with transparent backgrounds.
In the middle of the homepage, you will find the main image creation workspace. At the top, you can choose between Text to Image and Image to Image, depending on how you want to create your artwork.
The Model section gives you access to different AI image generation models. In the screenshot, GPT Image 2.6 is selected, and Nano Banana 2.1 and Seedream 5.5 are also shown as alternative models.
You can also choose between two available versions, Sunburst and Flare, before creating your image.
The Reference Images section allows you to upload your own images in JPG, PNG, or WebP format. You can use these reference images to guide the AI when generating new artwork.
Below that, you will find the Prompt section, where you can describe the image you want to create. There is also an AI Enhance option that can help improve your prompt before generating an image.
On the right side of the workspace, you will find History and Inspirations. History helps you access your previous generations, while Inspirations displays example creations that can give you new ideas for your own projects.
Overall, the Freepik AI homepage brings image generation, video creation, and several other AI-powered tools together in one place. You can explore different tools, experiment with image models, upload reference images, and create new content without having to search through multiple separate sections.
Freepik AI Pros and Cons
✓ Pros
- Images, video, music, voice, and editing in one place
- Access to many AI models without separate subscriptions
- Built-in upscaling and editing tools
- A large stock library alongside the AI tools
- Spaces for repeatable workflows
✕ Cons
- Credit costs add up quickly, especially for video
- Pricing and plans have changed several times in 2026
- Free access is limited
- Output quality depends on the model you pick
- The Freepik-to-Magnific rename can confuse new users
What Is Freepik’s AI Creative Platform?
Freepik is widely known for its collection of stock photos, illustrations, vectors, templates, and other creative resources. Its AI tools take that experience further by bringing several third-party AI models together in one place.
Instead of being a single AI model, the platform works more like an AI creative hub. It gives users access to different models for specific creative tasks, including image generation, video production, audio creation, and image enhancement.
This approach is particularly useful for people who regularly experiment with different AI models. A graphic designer might need one model for realistic product photography, another for illustrations, and a separate model for video production. Having these options in one workspace makes the creative process easier to organize.
For independent creators, digital marketers, YouTube producers, and small businesses, this can be a convenient way to manage different types of content production.
This is what I think, but it may be a little different. I have said what benefit I got from using it. You may get a little less benefit, or you may notice something different. Not everything feels good to everyone. What I understood, I have shared my opinion. Your opinion may be a little different. If it is different, because my opinion may not match yours. So I expressed my opinion. You try it yourself, as far as I know you will also like it.”
AI Image Generation Review
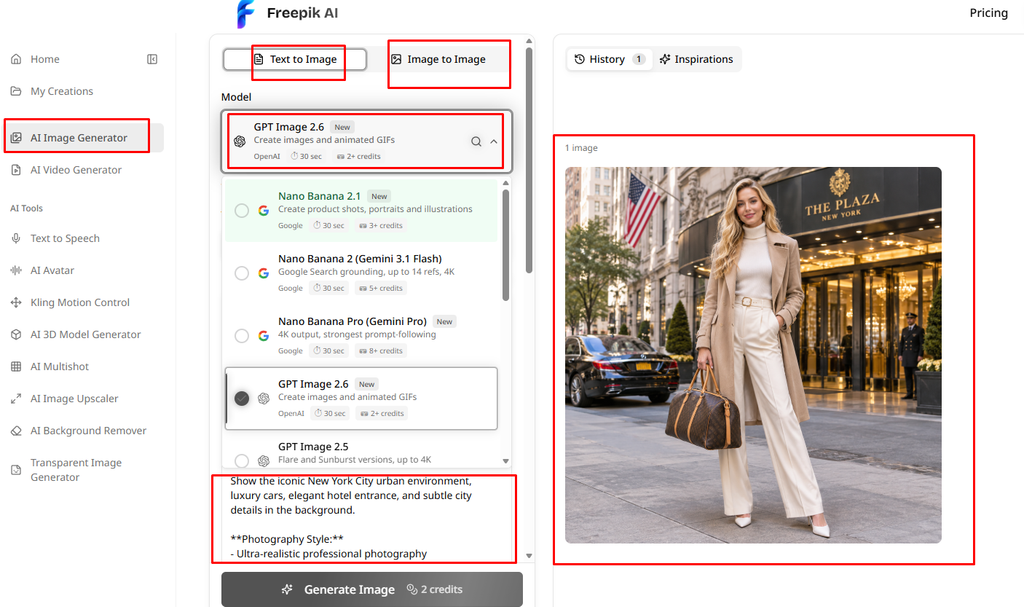
The AI Image Generator is one of the main features of Freepik AI. When you open this section, you will find a simple workspace where you can create images using text prompts or existing reference images. It offers two options: Text to Image and Image to Image. If you want to create an image from scratch, you can choose Text to Image. On the other hand, Image to Image lets you use an existing picture as a reference for creating something new.
Before generating an image, you can choose an AI model from the Model section. Freepik provides several options, including GPT Image 2.6, Nano Banana 2.1, Nano Banana 2 (Gemini 3.1 Flash), Nano Banana Pro (Gemini Pro), and GPT Image 2.5. Each model comes with its own features and credit requirements, so you can select one depending on the type of image you want to create.
For example, GPT Image 2.6 can create images and animated GIFs, while Nano Banana 2.1 is designed for product shots, portraits, and illustrations. Nano Banana 2 supports Google Search grounding and image references, while Nano Banana Pro offers 4K output and stronger prompt-following capabilities.
Once you select your preferred model, you can enter your description in the prompt box. Simply explain what you want the image to look like, including the subject, background, clothing, lighting, and photography style. In the screenshot, the prompt describes a woman standing outside a luxury hotel in New York City, surrounded by an urban environment and luxury cars.
After writing your prompt, click the Generate Image button to start the process. Freepik will use your selected model and prompt to generate the image. The credit cost is displayed on the generation button, so you can check how many credits are required before creating your image.
On the right side, the generated image appears in the results area. In this example, Freepik has created a realistic fashion photograph of a woman standing outside The Plaza hotel in New York. You can also access your previous generations through the History option or explore new creative ideas in the Inspirations section.
What can you do in the image generator? If you click on the image generator, what you can do after clicking, I have described it nicely above. And below I have given a nice 📸 Screenshot, and I had given one prompt with which a beautiful image of mine was generated. I myself have used it, but for my prompt, 2 credits were deducted here. You see, I created the image with the lowest, the lowest model there is, or on a low budget. That’s why 2 credits were deducted from me. I hope you have easily understood. I shared my opinion.
AI Video Generation Review
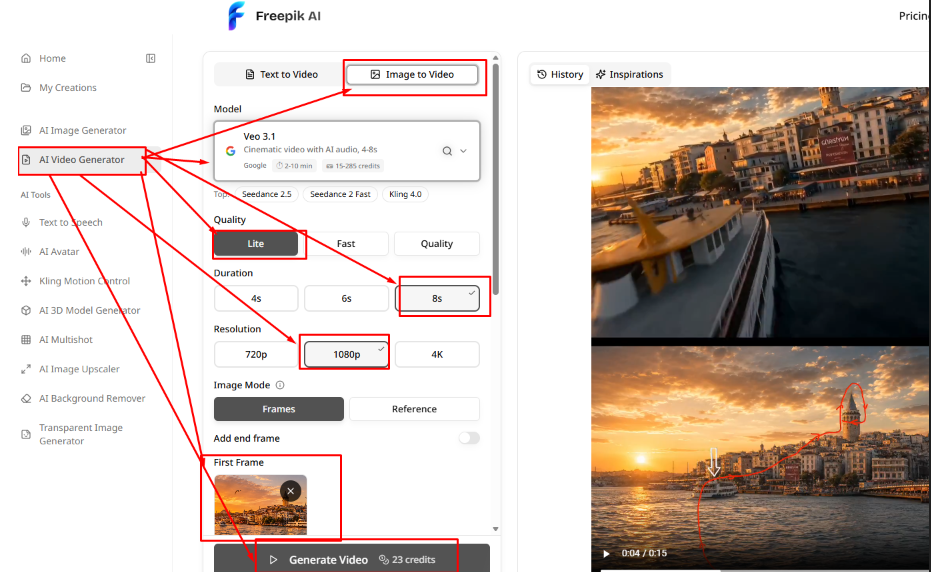
The AI Video Generator is another useful feature of Freepik AI that allows you to create videos using text prompts or existing images. When you open this section, you will find two options: Text to Video and Image to Video. With Text to Video, you can describe your idea in words and turn it into a video. If you already have an image, you can choose Image to Video to transform it into a moving video.
In the Model section, you can select an AI video generation model according to your needs. In the screenshot, Veo 3.1 is selected, which supports cinematic video generation with AI audio and video durations of 4–8 seconds. You can also explore other models, including Seedance 2.5, Seedance 2 Fast, and Kling 4.0.
Freepik also gives you control over video quality. You can choose Lite, Fast, or Quality, depending on how you want to generate your video. The Duration setting allows you to select 4, 6, or 8 seconds, while the Resolution section offers 720p, 1080p, and 4K options.
Another useful feature is Image Mode, where you can choose between Frames and Reference. The Frames option allows you to add a starting frame for your video, while the Reference option provides another way to guide the video generation using reference images.
You can also use the Add end frame option if you want to provide an ending frame for your video. In the screenshot, a sunset cityscape image has been uploaded as the First Frame, which the AI can use as the starting point for generating the video.
Once everything is ready, click the Generate Video button to start creating your video. Freepik displays the required credits before generation, so you can check the cost in advance. In this example, the generation button shows a cost of 23 credits.
After generation, your video will appear in the results area on the right side of the workspace. You can preview the generated result and check how your uploaded image has been transformed into a moving scene. The History option lets you access previous generations, while Inspirations helps you explore creative video examples.
“Look, what I said above, I have tried to cover both review plus tutorial. I know that just giving a review won’t be enough for you, I have tried to give the full details of how you will do a work, how you will do it. I wanted to present my opinion in this way so that you can work conveniently. But in all cases it’s the same, if you like it then definitely leave a comment, and if you don’t like it, it’s up to you.”
Text to Speech Review
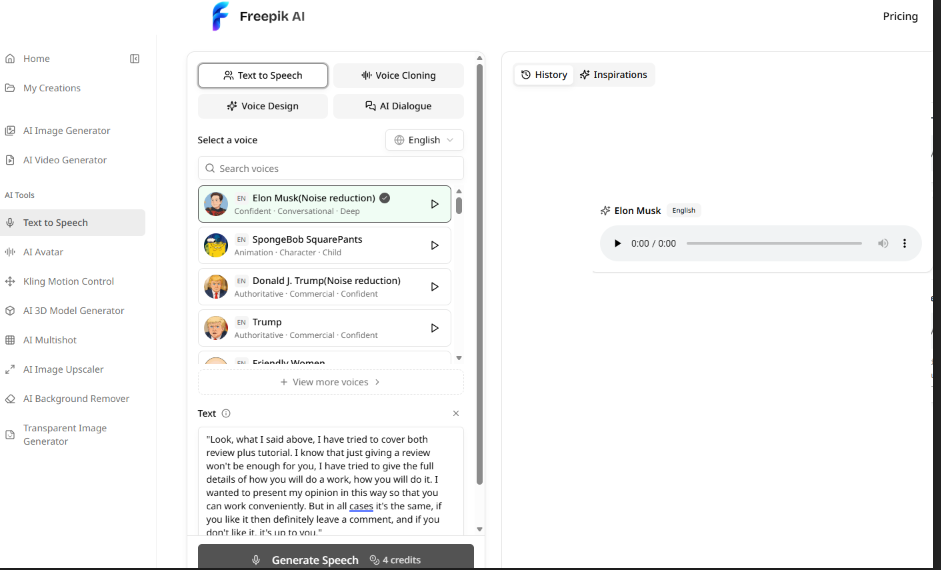
Freepik AI also includes a Text to Speech tool that lets you convert written text into spoken audio. When you open this section, you will find four options: Text to Speech, Voice Cloning, Voice Design, and AI Dialogue. Each option offers a different way to work with AI-generated voices.
To generate speech, first select your preferred language. The screenshot shows English selected, along with a search box that lets you find different voices. Freepik provides several voice options, including celebrity and cartoon-style voices are available and other voices. You can listen to the available voice samples before choosing one.
After selecting a voice, enter the text you want to convert into speech in the text box. You can use your own script, narration, or other written content. In the example, an English review script has been added to demonstrate how the tool works. Once your text is ready, click the Generate Speech button. The required credits are displayed on the button, so you can check the cost before generating your audio.
Your generated speech will appear on the right side of the workspace, where you can play and listen to the result using the built-in audio player. You can also visit the History section to access previous generations or explore the Inspirations tab for ideas.
AI Avatar Review
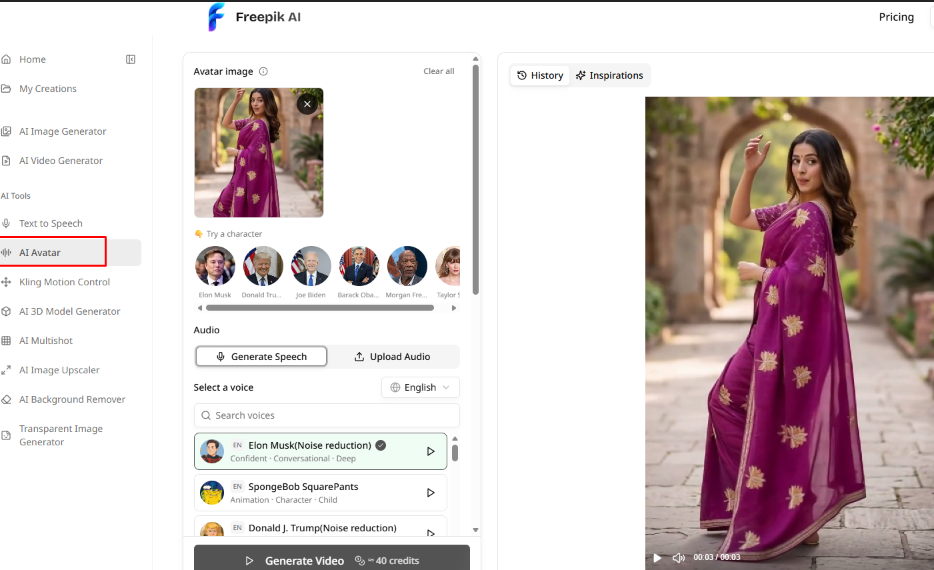
Freepik AI also offers an AI Avatar tool that can turn a still character image into an animated video. To get started, you can upload your own avatar image in the Avatar Image section. In the screenshot, a woman wearing a purple saree has been uploaded, and her image is used to generate the video shown on the right.
You can also explore the Try a Character section, which provides several ready-made character options. Some of the visible choices include Elon Musk, Donald Trump, Joe Biden, Barack Obama, and other characters. This gives you the option to experiment with different avatars instead of uploading an image every time.
One interesting part of this tool is the Audio section. You can either generate speech directly using the Generate Speech option or upload an existing audio file. Below that, you can select a language and choose a voice from the available voice library. A search box makes it easier to find a particular voice, and you can preview voices before selecting one.
Once your avatar and audio are ready, click Generate Video to create the animated result. The generated video appears in the preview area on the right, where you can play it and see how the uploaded character looks in motion. In this example, the woman in the purple saree appears as a short animated video.
Freepik also displays the required credits on the Generate Video button, allowing you to check the generation cost before starting. You can revisit previous results through History or explore more examples under Inspirations.
Freepik AI Pricing Review
Freepik AI offers three subscription plans: Basic, Pro, and Enterprise. Each plan is designed for different types of users, depending on how frequently they create AI images, videos, and other content.
The Basic plan costs $13.99 per month when billed annually, compared with the original price of $23.99. It includes 440 credits per month, which can be used to generate up to 440 images or 22 videos. This plan also provides access to AI Image Generator, AI Video Generator, AI Voice Generator, and AI 3D Model Generator. Other benefits include high-resolution output, priority generation, watermark-free downloads, commercial usage rights, and priority support.
The Pro plan is marked as Popular and costs $39.99 per month with annual billing, reduced from $66.99. It provides 1,760 credits every month, allowing users to generate up to 1,760 images or 88 videos. Along with access to AI image, video, voice, and 3D model generation, this plan includes unlimited access to AI models and features. It also offers high-resolution downloads, priority generation, no watermark, commercial usage rights, and priority support.
For larger organizations, Freepik provides the Enterprise plan at $69.99 per month with annual billing, compared with the original price of $116.99. It includes 3,520 monthly credits, enough for up to 3,520 images or 176 videos. Like the Pro plan, it offers unlimited access to AI models and features, along with image and video downloads, high-resolution output, priority generation, commercial usage rights, and priority support.
All three plans also display a limited annual bonus. Basic includes 440 extra credits, Pro offers 1,760 extra credits, and Enterprise provides 3,520 extra credits.
the Basic plan may suit individual content creators, while Pro offers more credits and additional access for professionals and teams. Enterprise is aimed at larger organizations that need higher monthly credit limits. You can compare the available features and choose the subscription that best matches your content creation needs.

Frequently Asked Questions
Is Freepik AI Suite the same as Magnific?
Yes. Freepik rebranded its platform as Magnific on April 28, 2026. The company is the same, your existing account carries over, and freepik.com now redirects to the new site.
Can I create music with Freepik AI?
The platform lists a music generator and sound effect tools among its audio features, but I only tested text to speech and the AI avatar tool for this review. Check the current tool list on the site to see what’s available on your plan.
Which AI models does it include?
At the time of testing, the image generator offered GPT Image 2.6, GPT Image 2.5, Nano Banana 2.1, Nano Banana 2, Nano Banana Pro, and Seedream 5.5. The video generator offered Veo 3.1, Seedance 2.5, Seedance 2 Fast, and Kling 4.0. The model list changes often, so you may see different options.
Does Freepik AI have a free plan?
Free access has been limited and has changed over time. Check the current pricing page to see what’s included.
Can I use the results commercially?
The paid plans I looked at include commercial usage rights. Terms can change, so confirm the license on the official site before using results in client work.
How many credits does each generation use?
It depends on the tool and model. In my tests, a basic image cost 2 credits, a Veo 3.1 video cost 23 credits, and avatar videos cost more. The credit cost is shown on the generate button before you start, so you can check it first.
How many videos can I make on the Basic plan?
The Basic plan lists 440 credits per month. Depending on the model and settings, that works out to roughly 10 to 20 videos, and fewer if you make avatar videos.
My Final Thoughts
Freepik AI is easy to use. The interface is clean, and the examples inside each tool make it simple to see what’s possible. I tried the image generator, video generator, text to speech, and AI avatar tools, and overall I liked the experience.
The main drawback is how quickly credits go. Avatar videos cost the most. On the Basic plan you get 440 credits per month, and if one avatar video uses about 40 credits, that’s only around 11 videos in the first month. Image generation is much cheaper (my test image cost just 2 credits), so how far your credits go depends heavily on what you create.
Everything else worked well. If you mostly make images and short clips, the credits should last a while. If you plan to make a lot of avatar or video content, consider a higher plan.